Initial Forays into 3D Printing
Last week, I received my Printrbot Plus v2.1 Kit. I sat down, and started putting it together.
The Assembly page on the kit website describes the kit as taking 6-10 hours to assemble. In the end, I spent about that getting the thing to the point where it was put together; it wasn’t all in one sitting, since I found out I was missing a part about 75% of the way through. You can see a time lapse of the initial assembly on YouTube.
Some things I learned during assembly — which almost anyone who’s built anything probably knows:
- Lay out your parts and count them before you start. Organize them, and put them in a spot where they are out of the way of your work area, but easily accessible. You’ll save a lot of time that way, and a lot of headache when you later find out you’re missing parts you need.
- For something like this — which required more than 100 screws — a good electric drill is a good idea. I had one, but didn’t think to use it until after my initial work; I wasted a lot of time on that.
- The Printbot process is targeted at tinkerers. This means that there are some aspects which are… slightly more fiddly than they should be. (One of my parts didn’t fit right to start with, and I spent the first 20 minutes of my assembly process trying to fit a part into a hole that it simply couldn’t fit in.) Don’t fight it too hard; if something doesn’t work, move on and come back.
In the end, I had to buy myself a ACME threaded hex nut myself to finish the build; I got an extra 5/16″ (non-ACME) hex nut instead of the 3/8″ ACME nut I needed shipped with the bot. (I emailed Printrbot support last Sunday about this — I’ve still heard nothing about this.) I used that to finish the assembly.
Initially, I was worried about my filament feeding; you can see a video showing how it doesn’t feed straight down, but feedback on the Printrbot Talk forum suggested this is normal, and I took the next steps of doing a print the following morning.
The first print out came out … poorly 🙂

The reason though was immediately obvious: early on in my print process, I couldn’t find a set screw on my y axis motor. Each layer that printed, my y-axis was slipping about 2-3mm in the wrong direction, which lead to the disaster that you can see.
On Friday night, I fixed that, and the next print was actually stacking the layers, which is good; but my bed being far from level meant that the print head was running into itself on higher layers, and created a mess.
My third print was the charm:
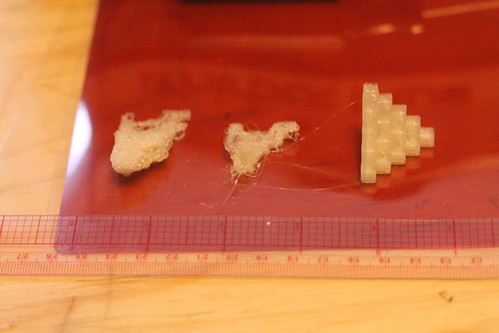
(Total print time was about 15 minutes.)
It produced a reasonably solid calibration print. (You can see a video of the printing process: part 1, Part 2.)
Since then, I’ve had more issues with extruder feeding, etc. but at least one of my prints actually worked, and it seems like I’m now in the same part of printing process that most hobbyists get to and stay in. 🙂
In total, I spent about 10 hours building the thing, another couple hours getting it set up and working. I consider the project a success overall.
Hopefully in the next couple weeks I can finish my assembly, get things tightened up, and get a few more interesting things printed 🙂